Let's encrypt TLS certificate in Domino
“Let’s encrypt” (https://letsencrypt.org/ ) is a new service that’s currently in public beta (since 3rd of december 2015 https://letsencrypt.org/2015/12/03/entering-public-beta.html)
Good news, it’s free, and it allows you to get certificates from a trusted CA (yes, trusted , they are included in recent Chrome , Firefox and Safari browsers). From their site : Anyone who owns a domain name can use Let’s Encrypt to obtain a trusted certificate at zero cost.
And even better, you can use it in Domino (at least since Domino 9.0.1FP2 , that adds TLS encryption). So now you have no more reasons to keep running a http only site, you can switch everything to https .
How does it work ? Insanely simple !
If you use Apache, it’s even fully automated, but for Domino, you can also generate certificates only, and then import them into the Domino keyring.
This shows how to do it on Linux (I use CentOS 7).
Install the let’s encrypt software
You need to install git first, then install the let’s encrypt client :
Log in as root, and I executed this from the /root folder :
yum install git
git clone <https://github.com/letsencrypt/letsencrypt>
Stop your http server
To run Let’s encrypt in the “certonly” mode, you need to have a “free” port 80 or 443. So stop the http server on your domino server (or stop the Domino server completely).
Create the certificate
Now run the client
cd letsencrypt/
./letsencrypt-auto certonly
There’s a lot more options, but this just focuses on creating a certificate to use in Domino.
The interface opens, with only one option really, a field where you can enter your hostnames.

Note that you need to enter hostnames here , Let’s encrypt does not support wildcard certificates for now. You can add multiple hostnames , they will be added as “alternates”.
The result is that the pem certificates are created in this directory :
/etc/letsencrypt/live/gwbasics.be/
Obviously; it depends on the domain name you entered.
You’ll find 4 files.
cert.pem -> ../../archive/gwbasics.be/cert1.pem
chain.pem -> ../../archive/gwbasics.be/chain1.pem
fullchain.pem -> ../../archive/gwbasics.be/fullchain1.pem
privkey.pem -> ../../archive/gwbasics.be/privkey1.pem
You’ll need all 4 , in the next steps.
Copy the certificates to a temporary location
You’ll need to run the kyrtool in the next steps as the user running your Domino server, so you need to put the .pem files in a location that that user can access.
I copied them to /tmp.
You must remove them afterwards, btw !
Install kyrtool
Download the kyrtool from FixCentral. You want to get KYRTool_9x_ClientServer .
Extract the zip, and then copy the correct kyrtool file to your Notes program directory, on your server.
cp kyrtool /opt/ibm/domino/notes/latest/linux/
Change the permissions on the file, so it’s executable by your notes user.
cd /opt/ibm/domino/notes/latest/linux/
chmod 755 kyrtool
You can also perform these tasks on an Administrator client - but why bother.
More information here : http://www-10.lotus.com/ldd/dominowiki.nsf/dx/kyrtool.
Create a new keyring and import the certificates
Now we create the keyring, and import our certificates that we put in /tmp.
You ‘ll need to execute the commands as the user that runs your Domino server, in my case, that’s “notes”.
Note that you can’t run kyrtool directly, but you need to run it through the “startup” executable.
su - notes
/opt/ibm/domino/bin/tools/startup kyrtool =/local/notesdata/notes.ini create -k /local/notesdata/keystore2.kyr -p
Now import your root certificate, the keys and the certificate that we got from Let’s Encrypt.
/opt/ibm/domino/bin/tools/startup kyrtool =/local/notesdata/notes.ini import roots -k /local/notesdata/keystore2.kyr -i /tmp/fullchain.pem
/opt/ibm/domino/bin/tools/startup kyrtool =/local/notesdata/notes.ini import keys -k /local/notesdata/keystore2.kyr -i /tmp/privkey.pem
/opt/ibm/domino/bin/tools/startup kyrtool =/local/notesdata/notes.ini import certs -k /local/notesdata/keystore2.kyr r -i /tmp/cert.pem
Configure your Sites to use the new keyring
Use a Notes client to go to your Domain’s names.nsf. Open the document that configures your SSL security (which can be a server document, or an internet site document).
Obviously, I use Internet Site documents.

The only thing you need to change, is the Key File name. It needs to point to the /local/notesdata/keystore2.kyr you created earlier.
Save and close the document, do the same for the other internet site document (eg. SMTP and LDAP, and other HTTP) and restart http.
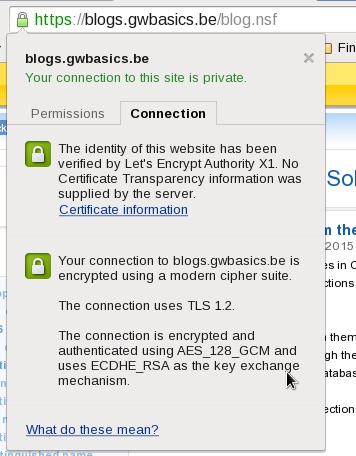
Done !
The site is now using a secure TLS encryption.
Continued here :
Part 2 - autorenew the certificates