Install Sametime Community Server 9
Root required for installation
Although the main goal of this series , is to install Sametime as non-root, for Domino it’s not possible to install as non-root.
So I’ll use root to install Domino here.
Prerequisites :
- DB2 Install DB2 v10.1
- An LDAP server Install TDS server
- Sametime System Console Install the Sametime System Console
- LDAP deployment Configure LDAP in the SSC
I have not been able to install Sametime correctly on a CentOS 64 bit server. So CentOS 32 bit (minimal install) is what I use here.
CentOS 32 bit
On top of a Cent OS 32 bit minimal install, you need to install these additional binaries :
Note that Perl is needed for vmware-tools installation, not for Sametime.
yum install openssh-clients xorg-x11-xauth xorg-x11-apps xorg-x11-utils xorg-x11-font* libcanberra-gtk2 glibc libgcc libXtst libXmu libXp libXft libXi libstdc++ compat-libstdc++-33 compat-libstdc++-296 compat-libstdc++-33 bc perl
Create user and group for Domino
This is the user/group that the Domino server will be started with.
groupadd -r notes
useradd -r -g notes -d /local/notesdata notes
Selinux
Setup selinux as permissive or disabled
[root@stcommunity domino]# setenforce Permissive
To set this in the configuration, change /etc/selinux/config :
vi /etc/selinux/config
X for the notes user
If you want to use X with the notes user, you need to setup X. Since I don’t give the notes user a password, I can’t login directly with that user. So I always need to use “su” .
Run xauth as root : you need to copy the output of xauth list into “xauth add …” command for your notes user.
xauth list
stcommunity.tb.issc.ibm.com/unix:10 MIT-MAGIC-COOKIE-1
su - notes
xauth add stcommunity.tb.issc.ibm.com/unix:10 MIT-MAGIC-COOKIE-1
xclock
The xclock command is just to check that it works … you should see the clock on your desktop.
Ulimit
Configure your system to allow at least 40000 open files for the notes user (the user that will be used to start the Domino server)
vi /etc/security/limits.conf
Install and configure Domino 9.0.1
Install Domino 9.0.1
You still need the 32 bit version of Domino (as opposed to the WebSphere components for Sametime, which can be 64 bit).
DOMINO_SERVER_9.0.1_LINUX_XS_32_EN.tar
as root: go to the location where you stored the install file.
[root@stcommunity software]# tar xvf DOMINO_SERVER_9.0.1_LINUX_XS_32_EN.tar
[root@stcommunity domino]# cd linux/domino
[root@stcommunity domino]# ./install
This starts the installer. Just step through the installer and accept all the defaults.
IBM Domino for Unix Install Program
Your DISPLAY is currently set to localhost:10.0
Answer Yes to continue in graphic mode
Answer No to continue in console mode
Answer Exit to exit application.
Do you wish to continue in graphic mode?[Yes]
I enter “no” here, because I do not want to install in graphic mode. ** no**
Continuing in console mode
InstallShield WizardInitializing InstallShield Wizard…
Preparing Java(tm) Virtual Machine…
……………………………..
……………………………..
……………………………..
……………………….
——————————————————————————-
Welcome to the InstallShield Wizard for IBM Domino Social EditionThe InstallShield Wizard will install IBM Domino Social Edition on your
computer.
To continue, choose Next.IBM Domino Social Edition
IBM
Press 1 for Next, 3 to Cancel or 4 to Redisplay [1]
International Program License Agreement
Part 1 - General Terms
BY DOWNLOADING, INSTALLING, COPYING, ACCESSING, CLICKING ON AN
“ACCEPT” BUTTON, OR OTHERWISE USING THE PROGRAM, LICENSEE AGREES TO
THE TERMS OF THIS AGREEMENT. IF YOU ARE ACCEPTING THESE TERMS ON
BEHALF OF LICENSEE, YOU REPRESENT AND WARRANT THAT YOU HAVE FULL
AUTHORITY TO BIND LICENSEE TO THESE TERMS. IF YOU DO NOT AGREE TO
THESE TERMS,* DO NOT DOWNLOAD, INSTALL, COPY, ACCESS, CLICK ON AN “ACCEPT”
BUTTON, OR USE THE PROGRAM; ANDPress Enter to continue viewing the license agreement, or, Enter “1” to accept
the agreement, “2” to decline it or “99” to go back to the previous screen, “3”
Print.
** Enter 1 here to accept the license agreement : 1**
Press 1 for Next, 2 for Previous, 3 to Cancel or 4 to Redisplay [1]
Selecting the option below allows you to install additional or upgrade existing
Server Partitions. The existing Program directory must be specified in order
for new Server Partitions to be created, but it will not be upgraded. Existing
Data directories do not need to be listed. Only those Data directories
specified will be upgraded or added. If you wish to add more than one Partition
to your existing Domino server, check the box when asked if you want to install
a Partitioned server. Otherwise you will only be able to upgrade or install one
Data directory. Warning: If you do not have an existing Domino Server on your
system, please do not check the box below for the option to add data
directories only.[ ] 1 - Install Data Directories Only for Partitioned Domino Server
To select an item enter its number, or 0 when you are finished: [0]
Press 1 for Next, 2 for Previous, 3 to Cancel or 4 to Redisplay [1]
IBM Domino Social Edition Install Location
Please specify a directory or press Enter to accept the default directory.
Program Files Directory Name [/opt/ibm/domino]
Server with more than one partition
Answer Yes to install partitioned server
Answer No to install non-partitioned server
Partitioned Server: [No]Press 1 for Next, 2 for Previous, 3 to Cancel or 4 to Redisplay [1]
IBM Domino Social Edition Install Location
Please specify a directory or press Enter to accept the default directory.
Data Files Directory Name [/local/notesdata]
Press 1 for Next, 2 for Previous, 3 to Cancel or 4 to Redisplay [1]
Input Unix/Linux user name and group name panel
User Name [notes]
Group Name [notes]
Press 1 for Next, 2 for Previous, 3 to Cancel or 4 to Redisplay [1]
Select Server Setup
After the installation completes, for new installation server setup will be
launched and for upgrade the server will be restarted automatically.The default value is “Manual Server Setup” which does not launch server setup
or restart the server after installation.Select “Local Server Setup” to launch server setup after a new server
installation or to restart the server after a server upgrade.Select “Remote Server Setup” to launch server setup in listen mode for new
server installations. You will then be able to connect to the server with the
Remote Server Setup tool.[ ] 1 - Local
[ ] 2 - Remote
[X] 3 - ManualTo select an item enter its number, or 0 when you are finished: [0]
Press 1 for Next, 2 for Previous, 3 to Cancel or 4 to Redisplay [1]
Choose the setup type that best suits your needs.
[ ] 1 - Domino Utility Server
Installs a Domino server that provides application services only. Note
that it does not include support for messaging services. See full
licensing text for details.[ ] 2 - Domino Messaging Server
Installs a Domino server that provides messaging services. Note that it
does not include support for application services or Domino clusters.[X] 3 - Domino Enterprise Server
Installs a Domino server that provides both messaging and application
services.[ ] 4 - Customize Domino Server
Allows you to select the features you want to install.To select an item enter its number, or 0 when you are finished: [0]
Accept the default, Domino Enterprise Server here. Do not customize the Domino server, unless you are 100% certain what you’re doing. You could run into issues later on if you do not install the full Domino Enterprise options.
Press 1 for Next, 2 for Previous, 3 to Cancel or 4 to Redisplay [1]
IBM Domino Social Edition will be installed in the following location:
Program Files: /opt/ibm/domino
Data Files: /local/notesdata
Domino Kit Type: EnterpriseServerUnix Install Options:
User Name: notes
Group Name: notes
Install Data Only: No
Start Server Setup: No (Manual)with the following features:
Program Files
Billing Support
Clustering Support
Data Files
Required Templates
Administration TemplatesPress ENTER to read the text [Type q to quit]
Optional Templates
Certificate Management
Readme File
Dojo
XPages
Domino Enterprise Connection Services
Domino Offline Services
IBM iNotes
Web Services Data Files
Resource Modeling Engine
Helpfor a total size:
1508.8 MB
Press 1 for Next, 2 for Previous, 3 to Cancel or 4 to Redisplay [1]
Installing IBM Domino Social Edition. Please wait…
|———–|———–|———–|————|
0% 25% 50% 75% 100%
||
Wait for it to complete.
Please, manually configure the Domino Server as follows:
1) Login as the appropriate Unix user: ‘notes’;
2) Change to the data directory using the command:’cd /local/notesdata’;
3) Configure the server using the command: ‘/opt/ibm/domino/bin/server’
To configure server remotely, the remote server setup tool
is required and you can use the command:
‘/opt/ibm/domino/bin/server -listen’
After issuing this command, additional instructions will appear
for remote server setup. For additional details see the section
‘Using the Domino Server Setup remotely’ in the IBM Domino
Administrator Help Documentation.
The InstallShield Wizard has successfully installed IBM Domino Social Edition.
Choose Finish to exit the wizard.Press 3 to Finish or 4 to Redisplay [3]
Configure Domino 9.0.1
Start the Domino server in listener mode to connect the Domino setup tool to it.
You can run the setup tool from another machine (you’d need to copy the remote configuration file) and connect remotely to it, or you can run it on the server if you have X installed.
Manual Domino 9 setup
Domino 9 silent setup using response file
You now should have a Domino 9 server (32 bit) that’s ready to be configured in detail, using the Notes Administration client.
Unfortunately, this is not available on Linux.
The first thing to do is to remove the attached userid file from the Sametime Administrator’s Person document …
Make sure you have a copy, though !
Install Community Server 9.0.1
You can install the 9.0.1 version immediately, no need to install the 9.0 version first.
You can install it using the user interface, but I use the silent method, and through the Sametime System Console.
So extract the install file to a directory.
Prepare a response file
This is in my response file .
-V SAMETIME_LOCALE="en"
-V licenseAccepted="true"
-V UNIX_DataDir="/local/notesdata"
-V UNIX_UserName="notes"
-V UNIX_GroupName="notes"
-V UNIX_ServerName="stcommunity32.tb.issc.ibm.com"
-V UPGRADE_SAMETIME="true"

-V USE_SAMETIME_SYSTEM_CONSOLE="true"
-V SSC_DEPLOYMENT_PLAN_NAME="stcommunity32"
-V SSC_ADMIN_USERNAME="dmgrwasadmin"
-V SSC_ADMIN_PASSWORD="passw0rd"
-V SSC_HOSTNAME="stssc.tb.issc.ibm.com"
-V SSC_USE_SSL="false"
# Default SSC port SSC_USE_SSL=true
#-V SSC_PORT="9443"
# Default SSC port SSC_USE_SSL=false
-V SSC_PORT="9080"
> -V SAMETIME_SERVER_HOSTNAME="stcommunity32.tb.issc.ibm.com"
Save it in a location , eg. as /tmp/stcommunity.txt
Create Deployment plan
Open the Sametime System console
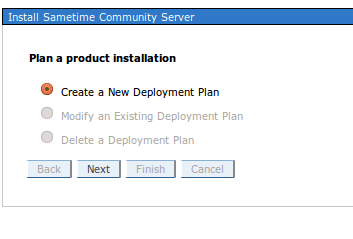
Select “Create new deployment plan”
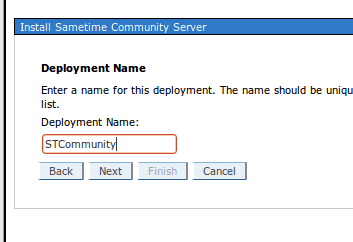
Name the deployment plan
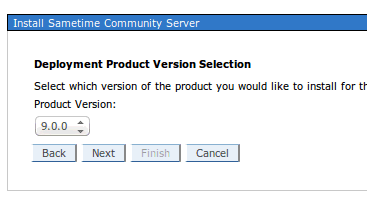
Select the version (select 9.0.0)
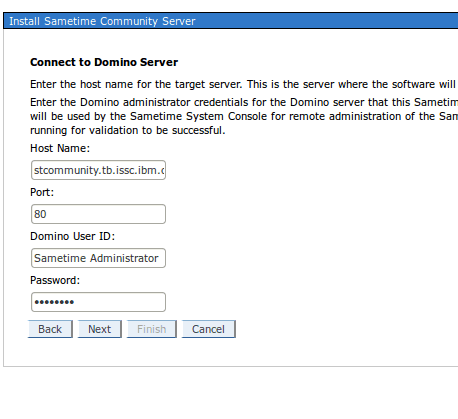
Enter your Sametime Administrator password and the hostname for your Sametime server (that is not yet installed at this point, obviously)
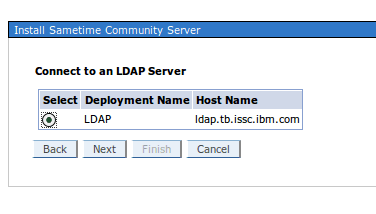
Select your LDAP deployment that you created earlier ( SSC LDAP configuration )
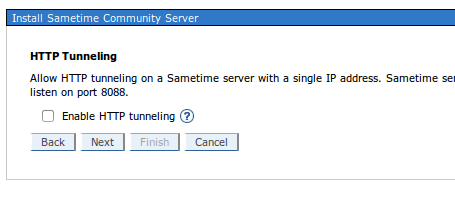
Do NOT enable http tunneling (performance can be bad if you do).
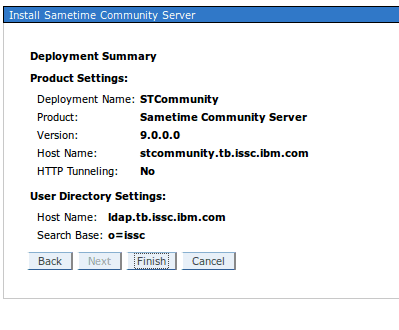
Check your settings and click finish.
Silent installation
Now kick off the silent installation.
- stop the domino server
- start the installer
export ST_BYPASS_PREREQ_CHECK=true
cd /mnt/hgfs/hostroot/local/Downloads/IBM/Sametime/90_fixes/SametimeStandardServer/Server
./setuplinux.bin -silent -options /tmp/stcommunity32.txt -is:log /tmp/installlog.txt
Check the log files :
tail -f /tmp/installlog.txt
cat /local/notesdata/SametimeInstall.log
Sametime Community 9 is now installed successfully, to test, you can configure a Sametime Community in a Sametime Connect client or in a Notes Client .
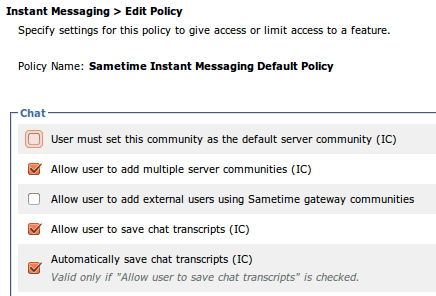
Note that if you already have a community configured, you first need to change the Sametime Community policy to allow that the Community is not the default :
CentOS 64 bit
This is the theory to install onto a 64 bit CentOS. In reality, I have not been able to make it work .
Warning : I’m using CentOS 6.5 - which is not supported by IBM. This means none of this is supported as such .
To be able to use scp and ssh, install openssh-clients as well on the server:
yum install openssh-clients
yum install xorg-x11-xauth
yum install xorg-x11-apps
yum install xorg-x11-utils
yum install xorg-x11-font*
yum install libcanberra-gtk2
yum install bc
These 32 bit binaries are also required :
yum install glibc.i686
yum install libgcc.i686
yum install libXtst.i686
yum install libXmu.i686
yum install libXp.i686
yum install libXft.i686
yum install libXi.i686
yum install libstdc++.i686
yum install compat-libstdc++-33.i686
yum install compat-libstdc++-296
yum install compat-libstdc++-33
Here are the detailed requirements for Sametime.
http://www-01.ibm.com/support/docview.wss?uid=swg27039649#Sametime%20Complete
Increase to at least 2 Gb of memory
The installation should go like this :
export ST_BYPASS_PREREQ_CHECK=true
./setuplinux.bin -silent -options /mnt/hgfs/hostroot/local/Doc/INSTALL/sametime9/community/options-unix-ssc.txt -is:log /tmp/installlog.txt
However all installation modes fail after installing 90% (so also ./setuplinux.bin and ./setuplinux.bin -console )